
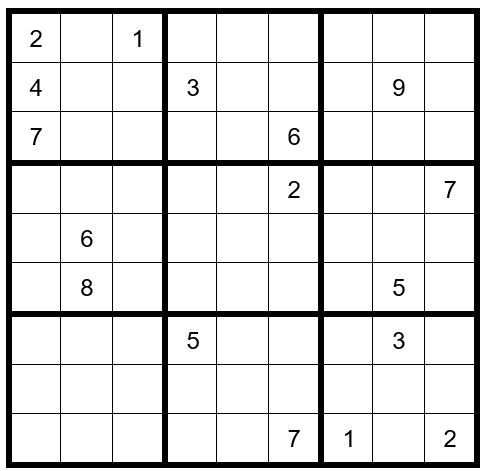
Sudoku Puzzle #66
by: Dan LeKander
Hands down this may well be the most challenging Sudoku puzzle yet. The “impossible” series continues.
DAN’S 8-STEP APPROACH TO SOLVING ALL SUDOKU PUZZLES
Once you have completed the puzzle, to the extent that you have filled-in all obvious answers and have written all potential options across the top of the unsolved cells (PUZZLE PREPARATION), Dan recommends the following Steps to complete the puzzle.
Step 1: Sudoku Pairs, Triplets and Quads – See September 2015
Step 2: Turbos & Interaction – See October 2015
Step 3: Sudoku Gordonian Rectangles and Polygons – See November 2015
Step 4: XY-Wings & XYZ Wings – See December 2015
Step 5: X-Wings – See January 2016
Step 6: DAN’S YES/NO CHALLENGE
Step 7: DAN’S CLOSE RELATIONSHIP CHALLENGE
Step 8: AN EXPANSION OF STEP 7Steps 1-5 are relatively common techniques and are explained in the TI LIFE articles above. Steps 6-8 are covered in detail, in Dan’s book.
PUZZLE PREPARATION
Prior to utilizing techniques first complete the 5 Steps of Puzzle Preparation …
- FILL IN DATA FROM OBSERVATIONS
- FILL IN OBVIOUS ANSWERS
- FILL IN NOT-SO-OBVIOUS ANSWERS
- MARK UNSOLVED CELLS WITH OPTIONS THAT CANNOT EXIST IN THOSE CELLS
- FILL IN THE OPTIONS FOR THE UNSOLVED CELLS
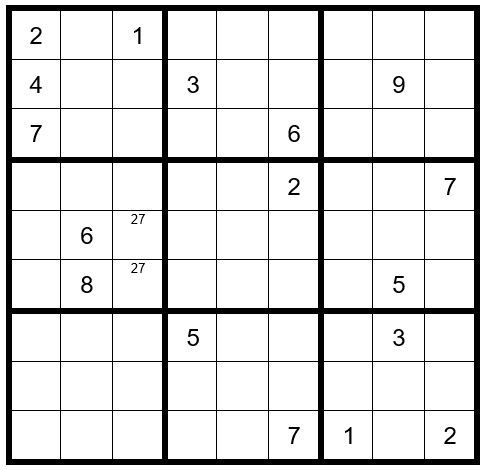
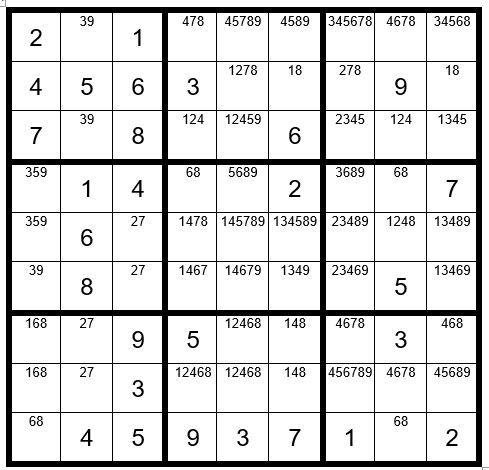
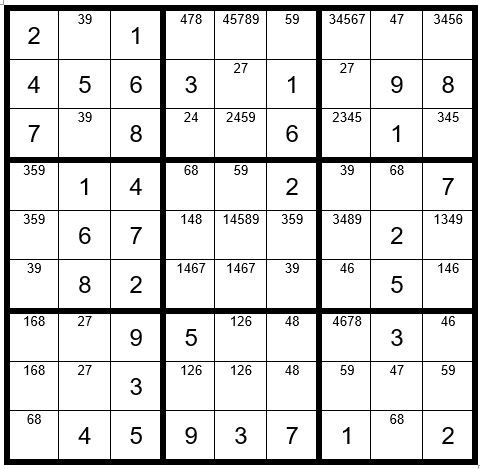
First, we will look for obvious pairs. C3R4 & C3R5 are the only two unsolved cells in box four that can have options 2 & 7, so mark your grid as such, giving you Example #66.1 below:
Now we will complete all of the first 4 steps in the order we observe them, versus all step 1, then step 2, step 3, and step 4 in order, before we move on to step 5.
We will start with the 1’s and navigate through 2’s to 9’s, then repeat the process until we conclude all step 1-4 clues.
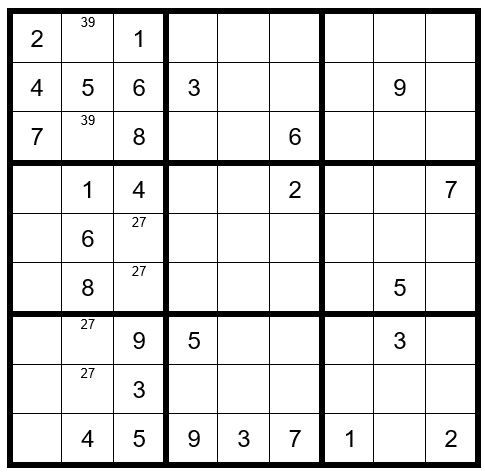
The first thing we observe is that C3R2 (cell in column 3, row 2) =6 (obvious answer). Then, C3R3=8.
C2R1, C2R2 & C2R3 must have options 359. There is already a 3 and 9 in row 2; therefore, C2R2=5. Indicate that C2R1 & 3 must have options 39.
The remaining unsolved cells in column 2 must have options 1, 2, 4 & 7. There is already a 1, 2 & 7 in row 9; therefore C2R9=4.
The remaining unsolved cells in column 2 must have options 1, 2 & 7. There is already a 2 and 7 in row 4; therefore, C2R4=1, and the remaining two unsolved cells must have options 27.
Cells C3R7, 8 & 9 must have options 3, 5 & 9. There is already a 3 and 5 in row 7; therefore, C3R7=9.
In box 9 the only cells that can have a 5 as an option are C7R8 and C9R8; therefore, a 5 cannot exist as an option in C3R8; therefore, C3R9=5. And it follows that C3R8=3.
In box 8 the only cell that can have a 3 is C5R9. C5R9=3.
Now the only cell in row 9 that can be a 9 is C4R9. C4R9=9.
And finally, the only unsolved cell in column 3 that can be a 4 is C3R4. C3R4=4.
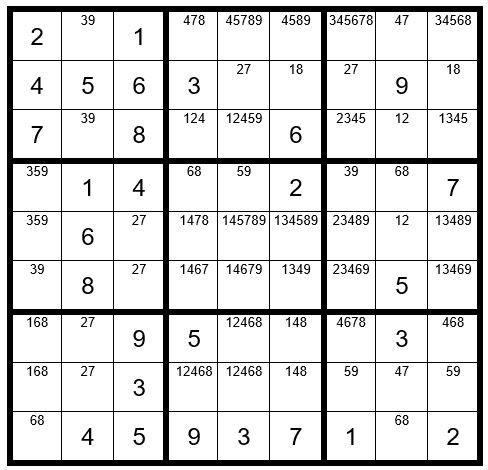
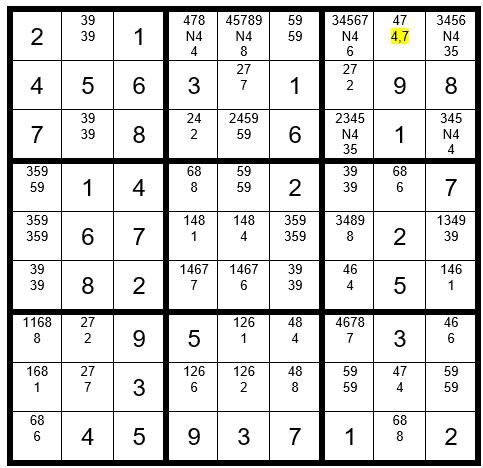
Now your grid should look like Example #66.2 below:
This concludes Puzzle Preparation except for filling the options for the remaining unsolved cells. Now your grid should look like Example #66.3 below:
STEPS 1-5
Starting with Step 1, there are obvious pairs 68 in row 4 and in column 8.
Options 6 and 8 can be eliminated in all other unsolved cells in row 4 and column 8. This also creates another obvious pair 47 in column 8. Also, process the obvious pair 18 in row 2.
In box 9 only two unsolved cells have both options 59, a hidden pair. You may delete all other options for C7R8 and C9R8.
Now your grid should look like Example #66.4 below:
There are no other Step 1-5 clues.
We will now proceed to Step 6: Dan’s Yes-No Challenge. We will start by searching the 1’s to see if there is a potential Step 6 clue, and then navigate through the 2-9’s.
There are 3 circumstances that establish the potential for a Step 6 exercise:
- Look for just 2 unsolved cells in a box that contain the same option where these 2 cells are not in the same row or column.
- Look for just 2 unsolved cells in a column that contain the same option where these 2 cells are not in the same box.
- Look for just 2 unsolved cells in a row that contain the same option where these 2 cells are not in the same box.
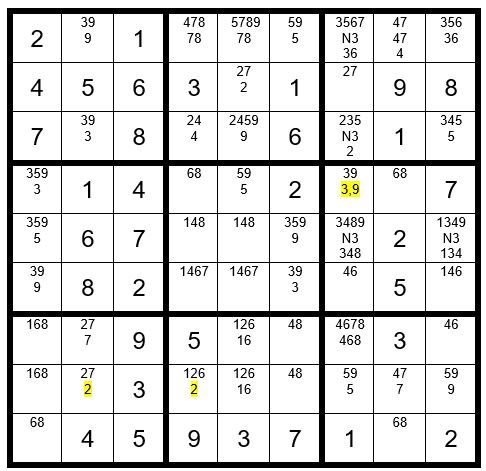
In Example #66.5 below we find two unsolved cells in row 2 that are not in the same box having a 1 as an option, C6R2 & C9R2, which become our “driver” cells. One of these two cells must be a 1.
We start with C6R2 and assume it is the 1 and assign a “Y”. We then mark, as before, the cells which can and cannot be a 1 with the Y’s and N’s. We then assume C9R2 is the 1 and assign a “y”. We then mark the cells which can and cannot be a 1 with the yes’s and no’s. Where we see a N, n indicates a cell that cannot be a 1 regardless of whether C6R2 or C9R2 is the 1 in row two. You can remove the 1 as an option in C6R5.
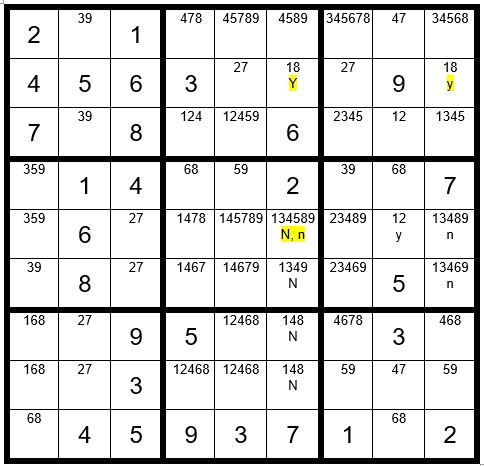
Now your grid should look like Example #66.6 below:

That exercise did not benefit us much, and there are no other Step 6 productive clues.
We will move on to Step 7: Dan’s Close Relationship Challenge. In this exercise we will select any two-option unsolved cell as the driver cell. My first choice is C8R3 with the sequence 1,2 as marked below in Example #66.7. I chose this cell and sequence because the cell has multiple adjacent unsolved cells with 1 as an option and the 2 may track through the puzzle to give us significant information.
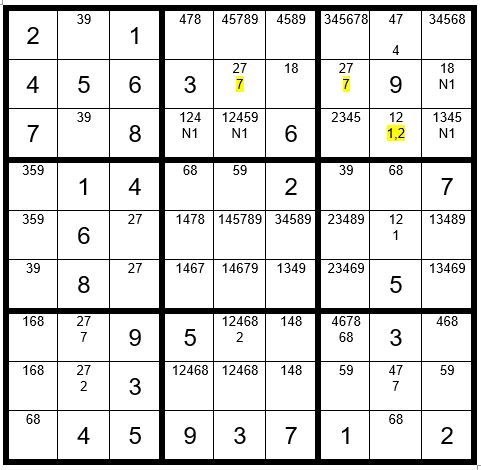
We know that C8R3 must be a 1 or 2. First, we will assume it is a 1. If this is true, then C4R3, C5R3, C9R2, & C9R3 cannot be a 1 (hence the notation N1).
Next, we will assume C8R3 is a 2. We will track the 2 through the grid to see the value of unsolved cells. If an N1 cell is a value other than 1, then we know that it is not a 1 regardless of whether C8R3 is a 1 or 2.
We track C8R3 being a 2 through the grid above in the lower level of each unsolved cell. C8R5=1, C7R2=7, C3R1=4, C8R8=7, C2R8=2, C2R7=7, C5R7=2 & C5R2=7. This is an obvious conflict, as there cannot be two 7’s in row 2. What does that tell us? Quite simply, C8R3 cannot be a 2; therefore, C8R3=1. C9R2=8. C6R2=1. C8R5=2. C3R5=7. C3R6=2, C5R6=2. C6R7 & C6R8 now have options 48. Take that into account in column 6 and box 8. C1R6 & C6R6 now have options 39. Take that into account in row 6. Now your grid should look like Example #66.8 below:
Note that in box 5 we have created an obvious triplet with 359. You may eliminate the 5 and 9 as options from C5R5, giving us Example #66.9 below:
Well, we made a heap of progress, but didn’t solve the puzzle. Let’s try another Step 7. Choosing C8R1 with sequence 4,7 we will use the same principles as before. With our N4’s in place we will now track the 7 through the puzzle above. What did we learn? Four cells, C5R1, C7R1, C9R1 & C7R3 are not a 4 regardless if C8R1 is a 4 or 7, so we can eliminate the option 4 from those four cells. The puzzle does not track any further, so that is all we learned. (Your tracking the 7 through the grid may have produced a different conflict, depending on the direction you track the 7). This gives us Example # 66.10 below.
Looks like we will need to do another Step 7. We will choose C7R4 with sequence 3,9 per above example. Track the 9 through the puzzle. We have a conflict in row 8. This tells us that C7R4 is not a 9, and therefore, C7R4=3. This leads us to Example #66.11 below:

Next, we’ll try C6R1 with a sequence 5,9 per above example. Tracking the 9 through the puz-zle leads us to another conflict. You may discover a conflict in another area of the puzzle, based on how you tracked the 9. In any event, C6R1 is not a 9. C6R1=5. It follows that C5R4=5, C1R4=9, C1R6=3, C1R5=5, C6R6=9, C6R5=3, giving us Example #66.12 below:

Looks like we have to try another Step 7. We’ll pick C7R1 with sequence 6,7. As the 7 tracks through the grid, we have yet another conflict, indicating that C7R1 is not a 7; therefore, C7R1=6. It follows that C9R1=3, C2R1=9, C2R3=3, C7R6=4, C5R3=9, C5R5=4 & C5R1=8, giving us Example #66.13 below:
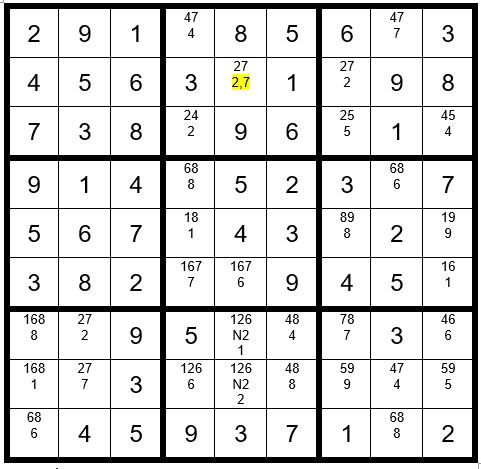
Hopefully this next Step 7 will be our last for this puzzle. We will select C5R2 as the driver cell with sequence 2,7. The 7 tracks totally through the puzzle without a duplicate number in each row, column and box. We have finally solved the puzzle!
This puzzle is a great example of one which requires numerous Step 7 exercises to solve the puzzle!
May the gentle winds of Sudoku be at your back.
Bu Dan LeKander, Wellesley Island