Sudoku Puzzle #44
by: Dan LeKander
Your September Sudoku puzzle brings you another challenge, now that the River has calmed …
DAN’S 8 STEP APPROACH TO SOLVING ALL SUDOKU PUZZLES
Once you have completed the puzzle, to the extent that you have filled-in all obvious answers and have written all potential options across the top of the unsolved cells (PUZZLE PREPARATION), Dan recommends the following Steps to complete the puzzle.
Advanced Techniques
Step 1: Sudoku Pairs, Triplets and Quads – September 2015
Step 2: Turbos & Interaction – October 2015
Step 3: Sudoku Gordonian Rectangles and Polygons – November 2015
Step 4: XY-Wings & XYZ Wings – December 2015
Step 5: X-Wings – January 2016
Step 6: DAN’S YES/NO CHALLENGE
Step 7: DAN’S CLOSE RELATIONSHIP CHALLENGE
Step 8: AN EXPANSION OF STEP 7
Steps 1-5 are relatively common techniques and are explained in the TI LIFE articles above. Steps 6-8 are covered in detail, in Dan’s book.
Also, see Sudoku Puzzle Challenge… February 2016, March 2016, April 2016, May 2016, June 2016, July 2016, August 2016, September 2016, October 2016, November 2016, December 2016, January 2017, February 2017, March 2017 , April 2017, May 2017, June 2017, July 2017, August 2017, September 2017, October 2017 , November 2017 , December 2017, January 2018, February 2018, March 2018, April 2018. May 2018, June 2018, July 2018 and August 2018.
As a reminder, the basic rules of Sudoku are that the numbers 1-9 must be contained and cannot be repeated in a row, column, or box, and there can only be one solution to the puzzle.
PUZZLE PREPARATION
Prior to utilizing techniques first complete the 4 Steps of Puzzle Preparation …
*Fill in obvious answers
Fill in Not-so-obvious answers
Mark unsolved cells with options that cannot exist in those cells.
OBVIOUS ANSWERS …
Start with the 1’s to see if there are any obvious 1-choice answers. Then navigate the 2’s through 9’s.
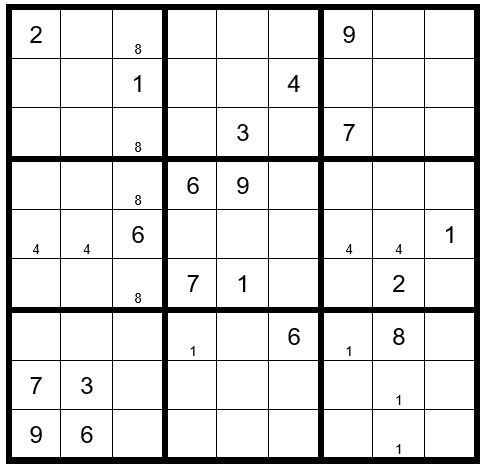
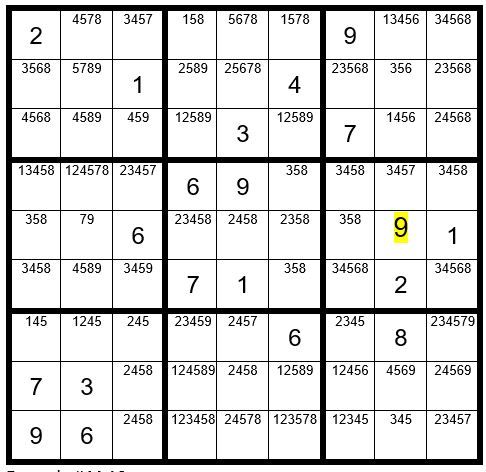
The first obvious answer is C2R9=6. C4R4=6.
Now your grid should look like Example #44.1 below:
NOT-SO-OBVIOUS ANSWERS … There are none.
MARK UNSOLVED CELLS WITH OPTIONS THAT CANNOT EXIST IN THOSE CELLS …
In box 7 (lower left-hand grid of 3 x 3 cells) a 1 can exist only in C1R7 or C2R7; therefore, a 1 cannot exist as an option in C4R7, C5R7, C7R7 or C9R7. We already know a 1 cannot exist in C5R7 & C9R7, so pencil a small 1 in the bottom of C4R7 & C7R7 to indicate they cannot be a 1.
In box 3 a 1 can only exist in C8R1 of C8R3; therefore, a 1 cannot exist in C8R8 or C8R9.
In box 5 a 4 can only exist in C4R5 or C5R5; therefore, a 4 cannot exist in C1R5, C2R5, C7R5 or C8R5.
In box 7 an 8 can only exist in C3R8 or C3R9; therefore, an 8 cannot exist in C3R1, C3R3, C3R4 or C3R6.
Now your grid should look like Example #44.2 below:
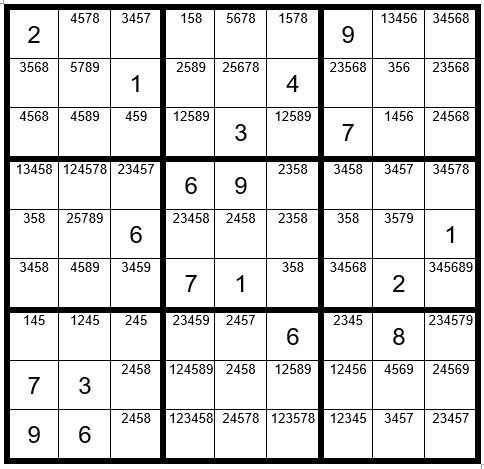
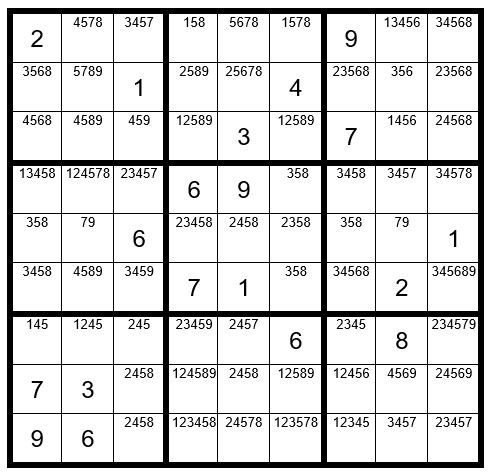
FILL IN THE OPTIONS FOR THE UNSOLVED CELLS …
Once you fill in the options for the unsolved cells, your grid should look like Example #44.3 below:
STEPS 1-8
We will begin with Step 1, identifying Pairs, Triplets, Quads & Quints. We will search each row, column and box. Can you spot any Step 1 clues in Example #44.3 above?
Take a close look at row 5. C2R5 & C8R5 are the only 2 cells in row 5 that can contain the 2 options 7 and 9 and are thus, a hidden pair; therefore, we can eliminate the other options from these two cells.
Now your grid should look like Example #44.4 below:
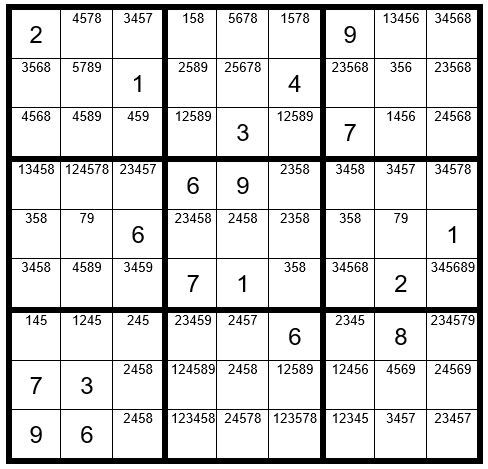
Can we identify any other Step 1-5 clues? In box 4 we see that a 2 only exists in C2R4 & C3R4; therefore, one of those two cells must be a 2. This precludes C6R4 from being a 2. Now your grid should look like Example #44.5 below:
There are no other Step 1-5 clues. We will now move to Step 6: Dan’s Yes-No Challenge.
There are 3 circumstances that establish the potential for a Step 6 exercise:
Look for just 2 unsolved cells in a box that contain the same option, where these 2 cells are not in the same row or column.
Look for just 2 unsolved cells in a column that contain the same option, where these 2 cells are not in the same box.
Look for just 2 unsolved cells in a row that contain the same option, where these 2 cells are not in the same box.
We will start by searching the 1’s, to see if there is a potential Step 6 clue, and then navigate through the 2-9’s.
In column 6 we find just 2 unsolved cells that contain the option 7 … C6R1 & C6R9. These cells are not in the same box, thereby qualifying as a candidate for a Step 6 exercise. These cells are highlighted in yellow in Example #44.6 below:
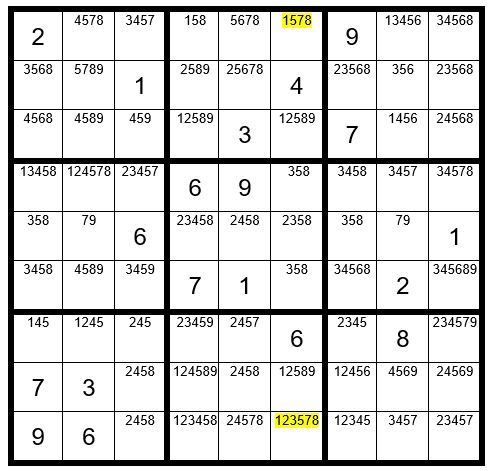
One of these two yellow cells must be a 7. We will consider them as “driver cells”, which “drive” the exercise.
Here is the logic; we will perform two exercises. First, we will assume C6R1 is the 7 and see which other cells cannot be a 7. Then we will assume C6R9 is the 7 and see which other cells cannot be a 7.
We will mark C6R1 with a “Y” and mark C6R9 with a lower case “y” to keep track of the exercise as per Example #44.7 below.
We will start by assuming C6R1=7. Then, as marked above, C2R1 and C3R1 are not a 7 (marked with a “N”). Then, C2R2=Y, C2R4 & C2R5=N, C3R4=Y, C8R4 & C9R4=N, C8R5=Y, and then C8R9=N.
Now we will assume C6R9=7 (y for yes). Then, C8R9 & C9R9=n, C9R7=y, and then C9R4=n.
We now see in Example #44.7 above that two cells have a “N,n” designation. What does that mean? Since we know one of the two yellow highlighted cells must be a 7 and that C9R4 and C8R9 are not a 7, regardless of which yellow cell is a 7, then 7 cannot be an option for those two cells.
Now your grid should look like Example #44.8 below:
We still need more clues to solve the puzzle, so we will perform another Step 6 exercise.
In Example #44.9 below we have selected C3R3 & C3R6 (highlighted in yellow) as the driver cells, since they are the only two cells in column 3 with a 9 as an option.
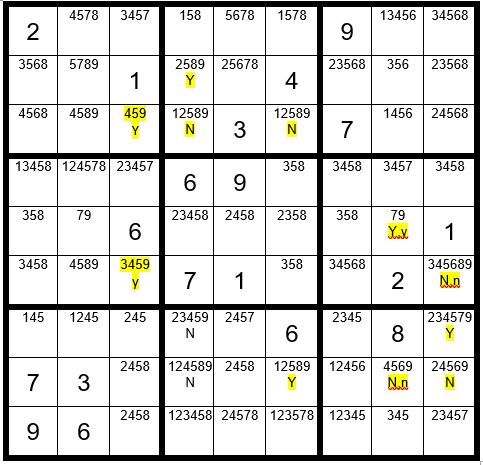
Again, first we assume C3R3 is the 9. Then, C4R3 & C6R3=N. C4R2=Y. C4R7 & C4R8=N. C6R8=Y. C8R8 & C9R8=N. C9R7=Y. C9R6=N. C8R5=Y.
Next, we assume C3R6 is the 9. Then, C9R6=n. C8R5=y.
We find C9R6 & C8R8 have a “N,n” designation, so the 9 can be removed from those cells. We also find C8R5 has a “Y,y” designation, so it is a 9, regardless of which starter cell is the 9. C8R5=9.
Now your grid should look like Example #44.10 below:
From this point the puzzle is easily solved. C2R5=7. C3R1=7. C4R4=7 and so forth.
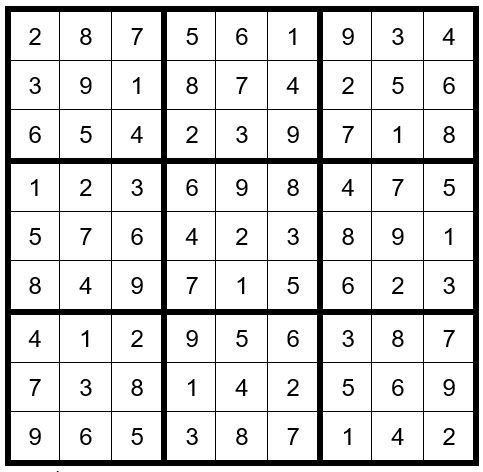
Your final grid should now look like Example #44.11 below:
Again, Step 6 has leveled the playing field!
May the gentle winds of Sudoku be at your back.
Dan LeKander
Editor’s note:
Do you tackle a Sudoku on your cottage veranda, sailboat cockpit, or at a campsite? Write and tell us where? OK.
Book Set LeKander
Editor's Note: It was back in January 2016, when we published a final article in Dan's series of steps to learn the logic of Sudoku – when he asked if we would like a puzzle to solve every month … this editor said an enthusiastic… Yes, please! Now we are several years later and on Puzzle #59. (How many have you solved... please let us know!)
If you have not already done so, I suggest you purchase Dan’s book: “3 Advanced Sudoku Techniques, That Will Change Your Game Forever!” Purchase of a book includes a 50-page blank grid pad, 33 black and two green tokens, to assist with Step 6.…
The book is available online at amazon.com and ebay.com.
Most importantly, I ask that you leave comments on any part of his series and throughout the year.